So, you have a broadband connection and your IP is not static. That’s a big problem in case you need to manage it remotely from anywhere in the world. So here’s a simple process to solve this issue and never remember your IP again. So to Automatically map dynamic WAN IP to your Mikrotik Router follow these steps:
- Login to your router via winbox.
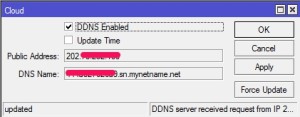
- Goto IP->Cloud. Check DDNS Enabled. Now note the ddns created for you.
- I bet you can’t remember the huge auto generated DDNS. If you can, go to step else follow along.
- Get a free .tk domain name or add a cname to your existing domain name pointing to the auto generated dns.
- Now, if you don’t know how to add cname records, consult your domain provider’s knowledgebase or drop a comment below. Suppose you have a domain – www.johndoe.com. Next step is to create a CNAME router.johndoe.com and make it point to the auto generated DDNS you copied from the Mikrotik cloud section.
- Now ping the cname – router.johndoe.com. You can see that it points to your DDNS which in turn points to your WAN IP.
- Everything’s good till now. But Mikrotik cannot auto update the IP, so every time ur IP changes u need to go to winbox login there and click force update in the IP-> Cloud which is pretty complicated.
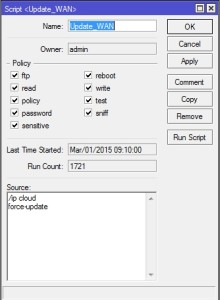
- Here comes the tricky part. Goto System -> Scripts.
- Click the “+” sign. Give a name (for example: Update_WAN) and under Source type in the following:
/ip cloud
force-update
- Click apply -> Ok.
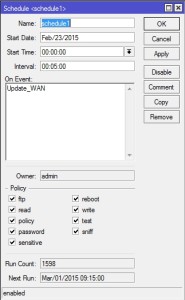
- Goto system->Scheduler.
- Click on “+” sign. Give a name. Under interval give 5 minutes (00:05:00) or a duration of your choice. Under On event give: Update_WAN which is the name of the script. Click Apply->Ok.
- Your are done.
- Now on every 5 minutes interval, mikrotik will force update the WAN IP. Thus even if your IP changes, it will always be mapped perfectly with your CNAME and you can manage your router using the CNAME you just created.