Huh!! What happens when you need to configure a Cisco 3750 immediately for production network but unfortunately you don’t have console, telnet, or SSH access? I know it’s damn scary and if it happens at 02:00 hours then you have no one to help you.
Problem:
Recently during an installation, I faced the exact same situation where I was presented with a Cisco 3750 switch but no methods of accessing it. Forget about SSH and Telnet as no Management VLAN was configured in it [It was totally an unconfigured one].
You might be thinking of Console access. Right? Damn it was not accessible too. Let me tell you the problems in brief.
- Only 1 PC had a Serial port and had only Ethernet to Console cable. No USB to Serial Converter were there.
- Console only displayed debug messages but keystrokes were were accepted.
- All the settings on my hyper terminal were correct and it was as per Cisco’s recommendation.
- Tried variations of Flow Control, baud rate etc but none helped.
- Tried atleast 4 different applications for console access including putty, hyper terminal, secure crt, tera term. Results were all same.
- Tried 4 brand new console cables.
After spending about 1 hour trying to figure out getting access to console, I was pretty sure something was messed up in the console access and I didnot have the USB converter to check it alternatively.
Tried Recovery mode too but as keystrokes were not accepted no way of typing anything into recovery mode.
Solution:
- Let the switch boot itself and you can see all the logging messages in the console screen.
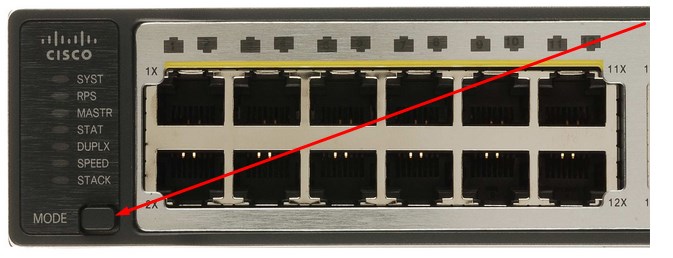
- After the switch is ready, press and hold the Mode button located in the front left side of the switch.
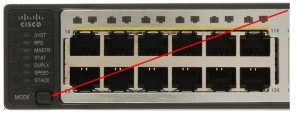
- Release the button as all the light starts glowing.
- Now in your console screen you will see a message – “Express Setup Mode”.
- Connect an ethernet cable and plug it into the switch (any port). Make sure your NIC is set to “Obtain IP Address Automatically”.
- You will notice that your PC will get an IP address in the 10.X.X.X series and DHCP allocation message will also be displayed on the console screen.
- Now, find the default gateway assigned to you but the Switch’s DHCP Server.
- Login via telnet to that server. No password will be asked.
- Issue the following command – setup
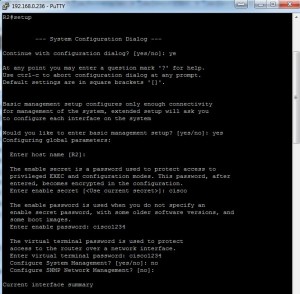
- You will be presented with a “System configuration Dialog”. Type Yes to enter the system.
- Give the following details one by one:
#Hostname
#Enable Secret
#Password
#Management Interface (I selected Management VLAN 1)
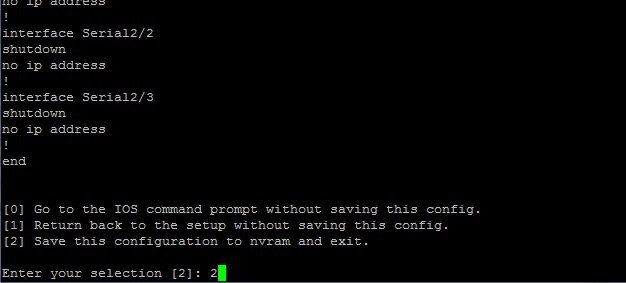
#Assign IP & Subnet Mask (Assign some Class C or Class B IP. Don’t Give Class A IP now as this is already assigned by DHCP Server, I gave 192.168.254.1/24) - After you have given the above mentioned details, you will be presented with a configuration script automatically created based on your given details.
- Double check all configurations. Then if your are sure then press 2.
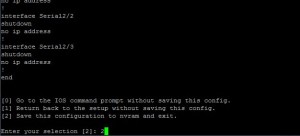
- It will save the configs.
- Your remote connection will be terminated immediately as Express setup will now exit followed by switch reboot but no worries.
- Next Set your PC’s IP to the same network as set in Management VLAN 1. ( I set it to 192.168.254.254/24).
- Telnet into your switch’s IP (192.168.254.1). Enter the passwords and voila you are good to go.