What is bridged transparent proxy?
In many scenarios, we don’t have direct access to the Gateways or is a simple SOHO Gateway. If a bridge is used, we don’t have to change anything in our network. We just plug in our Proxy/Cache Server and the system starts working. One more advantage is that there is no need of any client-side configuration for this. This technique may be applied in many cases like in Apartments where multiple users share an internet connection or in cyber cafes etc.
Why do we use Cache Server?
We use Cache Server to improve user experience, reduce usage of external bandwidth and many other security reasons. When an user browse any website, the static contents like the images, scripts etc are cached or stored in the cache server which resides on the LAN. Now, when another user access the same website, then the resources are delivered from the Cache Server & not from the Internet. Thus the web contents are loaded very fast and improves browsing experience.
In this tutorial you will learn how to setup this bridged cache server. The Network Configuration Diagram is given below. This tutorial is divided in 4 Sections :
a. Network Configurations
b. Drive Configurations (Optional)
c. Squid Configurations
d. Testing
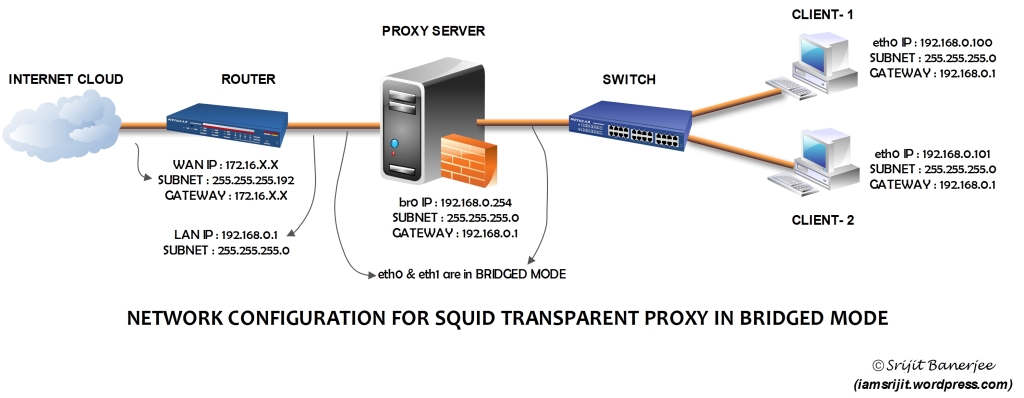
1. Network Configurations :
a) Install ebtables & bridge-utils
apt-get install Install
b) Edit interface Configurations
nano /etc/network/interfaces
delete all of the content contain eth0 and eth1 to become :
auto lo
iface lo inet loopback
c) Setup eth0 & eth1 become bridge and the firewall configurations when start/restart. Edit rc.local and add the following lines before “exit 0”
brctl addbr br0
ifconfig eth0 0.0.0.0 promisc up
ifconfig eth1 0.0.0.0 promisc up
brctl addif br0 eth0
brctl addif br0 eth1
ip link set br0 up
ip addr add 192.168.0.254/24 brd + dev br0
route add default gw 192.168.0.1 dev br0
sudo ebtables -t broute -A BROUTING -p IPv4 –ip-protocol 6 –ip-destination-port 80 -j redirect –redirect-target ACCEPT
sudo iptables -t nat -A PREROUTING -i br0 -p tcp –dport 80 -j REDIRECT –to-port 8080
Press Ctrl+X & Save the file.
What we did above is created br0 as bridge interface. Then we configured eth0 and eth1 with no IP address. Then we added eth0 & eth1 as the bridged ports. We then turned on br0 and assigned IP 192.168.0.254 & Gateway 192.168.0.1 to the br0 interface.
2. Drive Configuration (Optional) :
It is recommended that the cache server has atleast 2 HDD. One for storing OS Contents and another for Caching purpose to increase performance. In our configuration, we have two harddrives:
80 GB IDE : For Ubuntu Server 12.04 OS
500 GB SATA : For Cache
It is essential to format, create partition and then mount the second HDD for Caching. You can do it simply using Webmin.
3. Squid Configuration:
Install Squid
apt-get install squid3
Configure squid3:
nano /etc/squid3/squid.conf
Modify the following lines to get started :
http_port 8080 transparent
cache_dir ufs /media/data/cache 100000 16 256
Replace /media/data/cache with the directory which you want to be used for Cache Storage.
Give Permission to the Cache Folder:
chown proxy:proxy /media/data/cache
To initialise cache:
squid -z
Restart Squid
service squid3 restart
RESTART THE SERVER…
4. Testing :
Now. browse from any system connected to the switch without any IP Change and check output using squid access log.
tail -f /var/log/squid3/access.log
