A little Introduction…
Again I’m am writing about radius manager after a long time. But this time something more updated that is installation of Radius Manager in CentOS 7 which is currently the latest Cent OS version available. Here I will do the installation in a 64 bit version of CentOS 7 downloaded recently from CentOS Official website.
As we all know Radius Manager is a product of DMA Softlabs. Their support team told me that CentOS 7 is not compatible and told me to install 32 bit version of CentOS 6. But I thought of installing the latest OS ofr more updated and secured feature sets.
Initially I faced a lot of problem while trying to install Radius Manager 4 in CentOS 7. But eventually after lot of research and discussions with Mr. Syed Jahanzaib helped me to come up with a solution and install Radius Manager 4 in CentOS 7 perfectly.
However, If you want to install it in Ubuntu Server follow this.
Initial Prerequisites:
- CentOS 7 (64 bit preferred) – Downloadable from CentOS Official website – CentOS-7.0-1406-x86_64-DVD.iso
- Radius Manager 4.1.6 – Downloadable from customer portal of DMA Softlab.
- Radius Manager License Files – lic.txt and mod.txt – Downloadable from customer portal of DMA Softlab after purchase or trial.
Note: If you need to change MAC for CentOS 7 please refer to my tutorial here.
Update: Some users are facing yum repo issues after installing epel. To solve that:
1. nano /etc/yum.repos.d/epel.repo
2. Replace https with http.
3. Save and exit.
4. yum repolist. Verify installation is successful.
4. Issue yum update
Steps to install Radius Manager 4 in CentOS 7
- After you clean install CentOS 7 with proper NIC MAC Address configured, install nano for editing the configuration files.
yum install update
yum install nano
- Disable SELinux by editing the following and changing SELINUX=disabled
nano /etc/sysconfig/selinux
- Stop and disable CentOS 7 firewall. If you want to use firewall then you need proper configuration for allowing radius requests and reply messages.
systemctl status firewalld
systemctl stop firewalld
systemctl disable firewalld
- Install EPEL Repo.
rpm -ivh https://dl.fedoraproject.org/pub/epel/7/x86_64/e/epel-release-7-5.noarch.rpm
- Install all other dependencies.
yum install mc wget crontabs make gcc libtool-ltdl curl mysql-devel net-snmp net-snmp-utils php php-mysql php-gd php-snmp php-process ntp sendmail sendmail-cf alpine mutt mariadb-server mariadb php-mcrypt cronie wget phpmyadmin net-tools psmisc
- Install libraries.
yum install glibc.i686 libgcc_s.so.1
- Start and configure MariaDB (replacement from MySQL) services.
systemctl start mariadb.service
 systemctl enable mariadb.service
 mysql_secure_installation
- Start httpd.
systemctl start httpd.service
 systemctl enable httpd.service
- Allow phpmyadmin access.
nano /etc/httpd/conf.d/phpMyAdmin.conf
Comment out the <Directory “/usr/share/phpmyadmin”> stanza using ‘#’
Then add:
<Directory /usr/share/phpMyAdmin/>
Options none
AllowOverride Limit
Require all granted
</Directory>
Save and exit - Change authentication of phpmyadmin.
nano /etc/phpMyAdmin/config.inc.php
change the authentication in phpMyAdmin from cookie to http – $cfg[‘Servers’][$i][‘auth_type’] = ‘http’;
- Check php version.
php -v
- Download ioncube loaders.
wget http://downloads3.ioncube.com/loader_downloads/ioncube_loaders_lin_x86-64.tar.gz
- Extract the ioncube package.
tar -xvzf ioncube_loaders_lin_x86-64.tar.gz
- Move in to the ioncube directory and copy the loader based on your php version to the required php modules folder and assign a permission of 777 to the ioncube file.
cd ioncube
mv ioncube_loader_lin_5.4.so  /usr/lib64/php/modules/
chmod 777 /usr/lib64/php/modules/ioncube_loader_lin_5.4.so
- Find the location of your php.ini file.
php -i | grep "Loaded Configuration File"
- Edit and add ioncube loader location in the PHP configuration file.
nano /etc/php.ini
 Add after [PHP]:
 zend_extension = /usr/lib64/php/modules/ioncube_loader_lin_5.4.so
- Restart httpd service.
service httpd restart
- Check and verify ioncube installation.
php -v
- Download & install Free Radius.
wget http://www.dmasoftlab.com/cont/download/freeradius-server-2.2.0-dma-patch-2.tar.gz
tar -xvzf freeradius-server-2.2.0-dma-patch-2.tar.gz
cd freeradius-server-2.2.0
./configure
make
make install
- Verify freeradius installation by issuing:
radiusd -X
It may fail first time. Issue again, then you will get a message Ready to process.
- In case you need to kill the above process find the process id and then issue kill command specifying the process id.
ps ax | grep radius --> Note the pid
kill [pid]
- Move into MariaDB and create the required DB, users etc.
mysql -u root -pCREATE DATABASE radius;
CREATE DATABASE conntrack;
CREATE USER 'radius'@'localhost' IDENTIFIED BY 'radius123';
CREATE USER 'conntrack'@'localhost' IDENTIFIED BY 'conn123';
GRANT ALL ON radius.* TO radius@localhost;
GRANT ALL ON conntrack.* TO conntrack@localhost;
- Download and install radius manager 4.1.6 & proceed to install license files. Change the file locations.
wget https://dl.dropboxusercontent.com/u/xxxxx/radiusmanager-4.1.6.tar
tar -xvf radiusmanager-4.1.6.tar
cd radiusmanager-4.1.6
chmod 755 install.sh
./install.sh
cd /var/www/html/radiusmanager
wget https://dl.dropboxusercontent.com/u/xxxxx/mod.txt
wget https://dl.dropboxusercontent.com/u/xxxxx/lic.txt
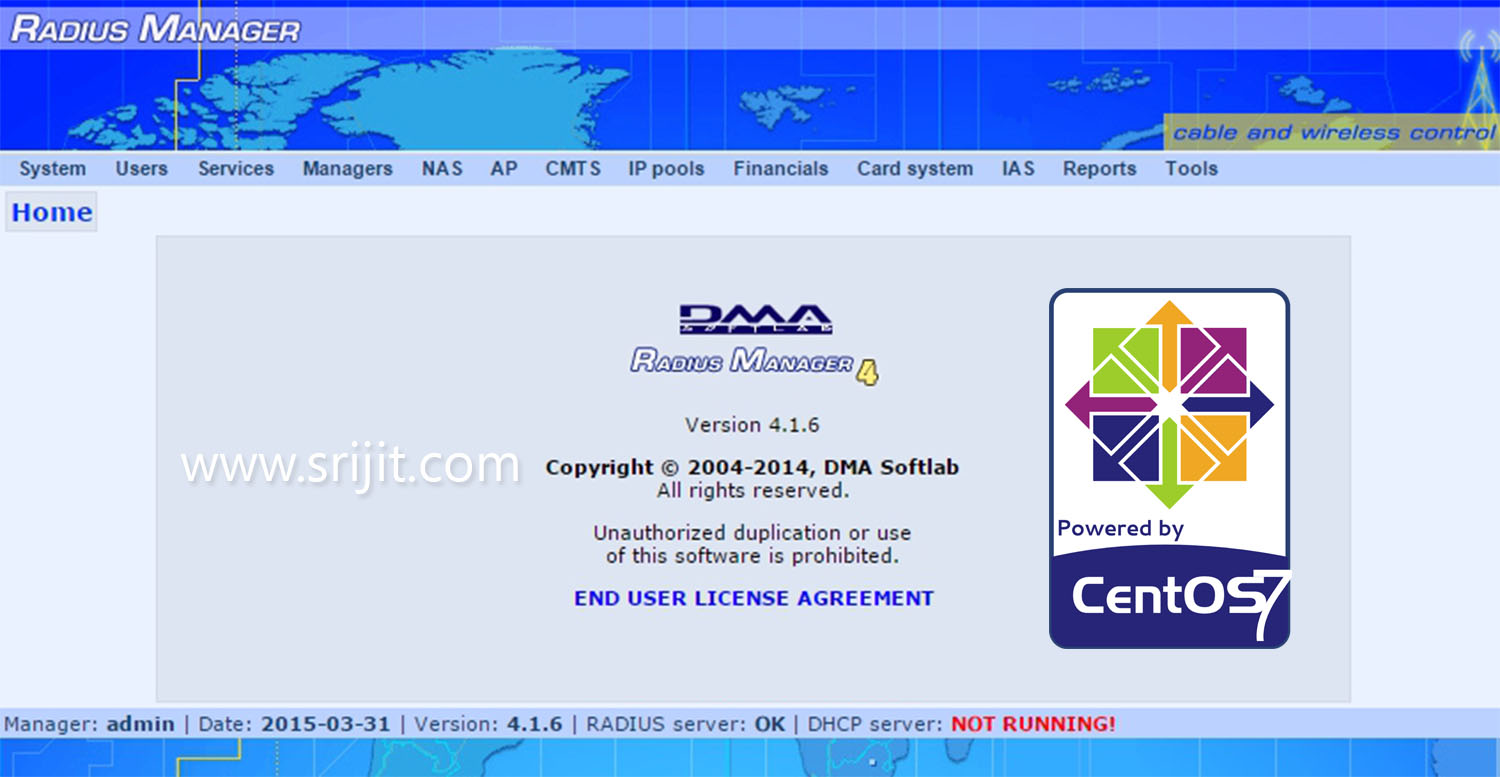
- Open your browser and go to: http://192.168.0.220/radiusmanager/admin.php
- Voila!! Installation is successful and you can now login.
- In case you get blank page, here are the possibilities:
(a) Php memory limit.
(b) Invalid license files.
(c) Permission error for ioncube loaders.
(d) Incompatible ioncube loaders. - Apache error log is located @ /etc/httpd/logs/error_log
Apache access log is located @ /etc/httpd/logs/access_log
Check those files for probable errors.
Video tutorial for installing Radius Manager 4 in CentOS 7
Cheers & enjoy configuring radius manager!